第12章:依存の向き(DIPの入口)をSoCで体験🧲🌟
この章はね、「関心を分ける(SoC)」を一段レベルアップして、**“依存の矢印の向き”**までコントロールできるようになる回だよ〜!🎀✨ ここができると、業務ルール(内側)が、ライブラリ都合(外側)に振り回されなくなるの🥹🛡️
1) 今日のゴール🎯✨
できるようになったら勝ち👇💖
- ✅ **業務ルール(ドメイン)**が、
fetchやlocalStorageや UI の事情を知らない状態にできる🧼 - ✅ 「外側(DB/API/ブラウザ)」を差し替えても、内側(ルール)がほぼ無傷でいられる🔁✨
- ✅ テストやリファクタが一気にラクになる🧪🌸
2) 「依存」ってなに?どの向きがヤバいの?🧠💥
たとえばドメインの中でこんなのを書いちゃうと…👇
// ❌ domain が fetch に依存しちゃってる例(やりがち)
export async function registerUser(userName: string) {
  const res = await fetch("/api/register", {
    method: "POST",
    body: JSON.stringify({ userName }),
  });

  if (!res.ok) throw new Error("登録失敗😭");
}
これ、パッと見は動くけど…😇 ドメイン(内側)が通信(外側)に引っ張られてるのが問題!
- APIのURL変わった🌪️ → ドメイン修正
- fetchをaxiosに変えたい🔁 → ドメイン修正
- ブラウザじゃなくNodeで動かしたい🧊 → ドメイン修正
つまり、変更の波🌊がドメインに直撃するの…🥺💥
3) DIPの超やさしい言い方🧲💖
DIP(依存性逆転の原則)は、難しい言葉に見えるけど、超ざっくり言うと👇
内側(業務ルール)は外側(技術詳細)に依存しない 代わりに、内側が“こういう機能が欲しい”という口(インターフェース)を用意して、 外側がそれを実装する
この「口」が Port(ポート) だよ〜🔌✨ そして外側の実装が Adapter(アダプタ) 🎛️✨ (この考え方は Ports & Adapters / Hexagonal Architecture として有名だよ📦🧠 (alistair.cockburn.us))
4) ミニ図でつかむ:矢印を“内側に向ける”🧭✨
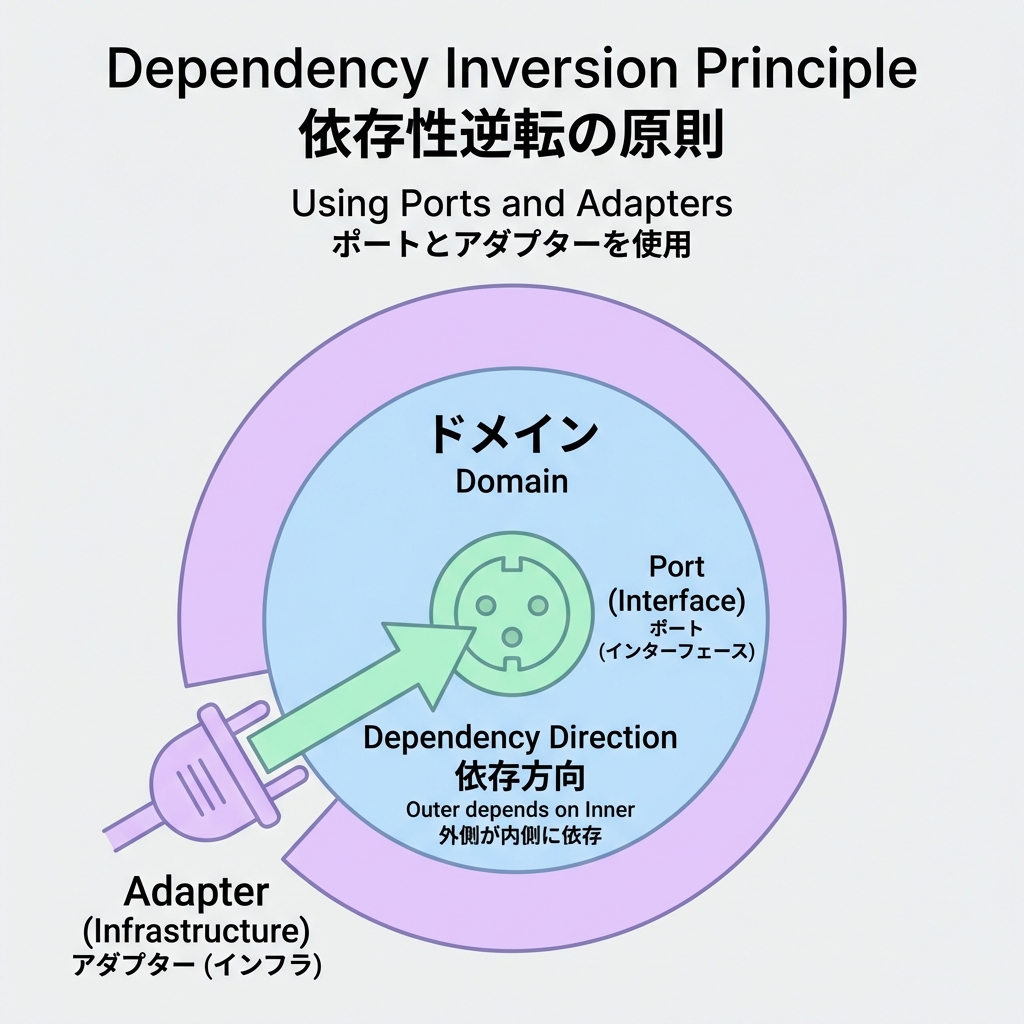
イメージはこれ👇
- ✅ ドメイン:ルール(いちばん守りたい💎)
- ✅ アプリ層:手順(ユースケースの流れ🧭)
- ✅ 外側:通信・保存・UI(交換可能な部品🔁)
ポイントは「依存の矢印」🧲 外側 → 内側に寄せると強い💪✨
5) ハンズオン:学園イベント申込で“依存の向き”を体験🎓💌
お題📌
「イベントに申し込む」
- 入力チェック(名前必須、文字数など)📝
- 申込データを保存(最初はメモリ、あとでAPIに差し替え)🔁
Step 1:ドメインは“純粋なルール”だけ🧼✨
// src/domain/registration.ts
export type Registration = Readonly<{
  id: string;
  eventId: string;
  userName: string;
  createdAtISO: string;
}>;

export function validateUserName(userName: string): string[] {
  const errors: string[] = [];
  const trimmed = userName.trim();

  if (trimmed.length === 0) errors.push("名前は必須だよ🥺");
  if (trimmed.length > 20) errors.push("名前は20文字までだよ✂️");

  return errors;
}
ここには fetch も localStorage も出てこないのが正解🙆♀️💖
ドメインは世界一ピュアでいてOK🧼✨
Step 2:ドメイン側に「欲しい機能の口(Port)」を置く🔌✨
// src/domain/ports.ts
import type { Registration } from "./registration";

export interface RegistrationRepository {
  save(reg: Registration): Promise<void>;
}
ここ大事! interface(口)は内側(ドメイン)に置くのがコツ🧠🛡️ こうすると、外側が勝手に実装を差し替えできる🔁✨
Step 3:アプリ層(手順)に“流れ”を書く🧭✨
// src/application/registerForEvent.ts
import { validateUserName, type Registration } from "../domain/registration";
import type { RegistrationRepository } from "../domain/ports";

export async function registerForEvent(
  repo: RegistrationRepository,
  input: { eventId: string; userName: string },
  deps: { now: () => Date; newId: () => string },
): Promise<{ ok: true } | { ok: false; errors: string[] }> {
  const errors = validateUserName(input.userName);
  if (errors.length) return { ok: false, errors };

  const reg: Registration = {
    id: deps.newId(),
    eventId: input.eventId,
    userName: input.userName.trim(),
    createdAtISO: deps.now().toISOString(),
  };

  await repo.save(reg);
  return { ok: true };
}
見て〜🥹💖
ここにも fetch がいない!
repoは“口”で受け取るだけ。これがDIPの入口🧲✨
6) Step 4:外側でAdapterを実装する(メモリ版)🧠📦
// src/infra/memoryRegistrationRepo.ts
import type { RegistrationRepository } from "../domain/ports";
import type { Registration } from "../domain/registration";

export function createMemoryRegistrationRepo(): RegistrationRepository {
  const data: Registration[] = [];

  return {
    async save(reg) {
      data.push(reg);
      console.log("保存したよ💾✨", reg);
    },
  };
}
これが Adapter 🎛️✨ でも依存の向きは infra → domain だよ(内側を参照してる)🧲💖
7) Step 5:外側でAdapterを実装する(HTTP版)🌐📨
// src/infra/httpRegistrationRepo.ts
import type { RegistrationRepository } from "../domain/ports";
import type { Registration } from "../domain/registration";

export function createHttpRegistrationRepo(baseUrl: string): RegistrationRepository {
  return {
    async save(reg: Registration) {
      const res = await fetch(`${baseUrl}/registrations`, {
        method: "POST",
        headers: { "content-type": "application/json" },
        body: JSON.stringify(reg),
      });

      if (!res.ok) throw new Error("通信に失敗したよ😭");
    },
  };
}
ドメインは無傷!🛡️✨ 差し替えは外側だけで完了できるのが最高ポイント🔁💖
8) 最後に“組み立てる場所”(Composition)で配線する🔌🧩
// src/ui/main.ts
import { registerForEvent } from "../application/registerForEvent";
import { createMemoryRegistrationRepo } from "../infra/memoryRegistrationRepo";
// import { createHttpRegistrationRepo } from "../infra/httpRegistrationRepo";

const repo = createMemoryRegistrationRepo();
// const repo = createHttpRegistrationRepo("https://example.com/api");

const result = await registerForEvent(
  repo,
  { eventId: "E-2026-OPEN", userName: "ボビー" },
  {
    now: () => new Date(),
    newId: () => crypto.randomUUID(),
  },
);

console.log(result.ok ? "申込完了🎉" : result.errors.join("\n"));
ここ(UIやmain)はいちばん外側だから、
memory → http に切り替えてもOK🙆♀️✨
9) “SoC×DIP”が効いてるチェックリスト✅💖
内側(ドメイン/アプリ層)に入ってたらアウトな単語😇💥
fetch/axioslocalStoragedocument/window- DBクライアント名(Prismaとか)🗄️
- フレームワーク固有のimport(Reactのhooksとか)⚛️
逆に、内側に置いてOKなもの🙆♀️✨
interface(Port)🔌- ルール・検証・計算🧮
- ユースケースの流れ🧭
10) AIに手伝ってもらう魔法の頼み方🪄🤖✨
Copilot/Codexに投げるなら、こういう指示が強いよ👇💖
- 「このコードの依存を逆転して、ドメインからfetchを消して。port interface を domain に置いて、adapter を infra に作って」🔌🧲
- 「Ports & Adapters の形で、差し替え可能なRepositoryにして。最初は in-memory、次に HTTP 実装も」🔁🌐
- 「“内側が外側を知らない”状態になってるか、チェックリストも出して」✅👀
11) ちょい最新ネタ:副作用(side effects)を遅らせる仕組みも増えてるよ⏳✨
TypeScript 5.9 では import defer っていう **“モジュールの実行(副作用)を、使う瞬間まで遅らせる”**書き方が入ってるよ🧠⚡
「副作用をコントロールする」って意味で、SoCの感覚と相性いい👍✨
ただし、TypeScriptが変換してくれるわけじゃなく、対応ランタイムやツールが必要だよ〜(--module など制約あり)📌 (typescriptlang.org)
12) この章のまとめ🎀✨
-
SoCは「分ける」🧺
-
DIPは「矢印の向きを内側にする」🧲
-
口(Port)を内側に置いて、外側(Adapter)で実装すると…
- ✅ 差し替えが簡単🔁
- ✅ ルールが守れる🛡️
- ✅ テストしやすい🧪
そして次の第13章で、ここでやった「渡すだけ」配線を DIとして整理していくよ〜💉😊
必要なら、この章のハンズオンを「小さい課題セット(3問くらい)🎯」にして、**提出→レビュー用の採点基準✅**まで作って渡せるよ〜!😆💖